


In modern automotive systems, the wiring harness plays a critical role in ensuring seamless communication between various electronic components. A failure in this essential component can lead to significant operational issues, ranging from malfunctioning sensors to complete vehicle shutdowns. Understanding how to effectively manage wiring harness failures is paramount for both manufacturers and maintenance professionals.
Repairing wiring harness defects requires a systematic approach, encompassing both diagnosis and prevention strategies. Technicians must be equipped with the knowledge to identify symptoms of failure, such as electrical shorts, open circuits, and insulation breakdowns. By employing advanced diagnostic tools and techniques, professionals can quickly pinpoint the location and nature of the issue, thereby minimizing downtime and maintaining vehicle reliability.
Preventive measures are also crucial in managing potential wiring failures. Regular inspections and adherence to manufacturing specifications can significantly reduce the incidence of defects over time. Furthermore, investing in high-quality materials and robust design principles can enhance the durability of wiring harnesses, ultimately leading to improved performance and safety in automotive systems.
Identifying Common Wiring Harness Issues in Vehicles
Wiring harnesses in vehicles are critical components that facilitate the electrical connections between various systems. However, over time, they can develop several common issues that may disrupt vehicle functionality. Identifying these issues early can prevent extensive damage and costly repairs.
One of the most prevalent problems is fraying or insulation damage. This may occur due to wear and tear, exposure to high temperatures, or contact with moving parts. Inspecting the harness for any visible signs of damage is essential, as exposed wires can lead to short circuits or electrical failures.
Another common issue is corrosion at connection points. This is particularly prevalent in areas exposed to moisture or road salt. Corrosion can impede electrical flow, causing erratic behavior in connected systems. Regular checks of connectors and terminals can help detect corrosion early, allowing for effective cleaning or replacement.
Loose connections also pose a significant threat to wiring harness integrity. Vibration from vehicle operation can lead to connectors becoming loose over time. Routine inspections should include ensuring that all connectors are secure and that no wires are excessively tugged or stretched.
Furthermore, a harness may suffer from chafing due to vibrations against sharp edges or components. Identifying areas where the harness may rub against other parts can help mitigate this problem. Protective measures, such as using grommets or protective sleeves, can be implemented to reduce the likelihood of damage.
Lastly, issues related to rodent damage are becoming increasingly common. Rodents may chew through insulation, causing short circuits. Installing protective barriers or using repellents can help deter these pests and preserve the integrity of the wiring harness.
In summary, proactive identification of these common wiring harness issues can significantly enhance vehicle reliability. Regular inspections and maintenance are vital to ensure that the harness remains in good condition, reducing the risk of operational failures.
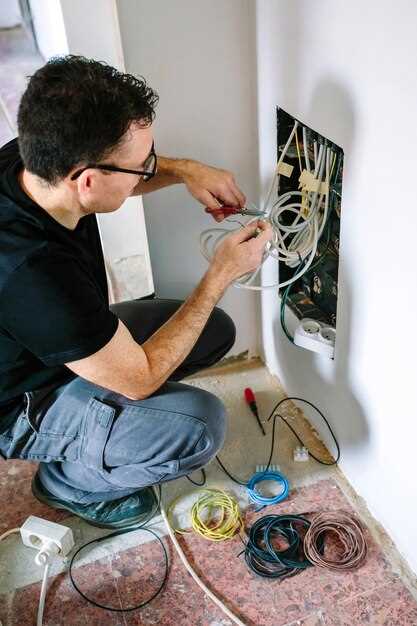
Step-by-Step Repair Process for Damaged Wiring Harnesses
Repairing a damaged wiring harness is critical for ensuring the proper functioning of automotive systems. Follow these steps to securely manage the repair process.
Step 1: Identify the Damage
Begin by conducting a thorough inspection of the wiring harness. Look for visible signs of wear, fraying, or breaks in the wires. Use a multimeter to test for continuity and identify any short circuits or open circuits within the harness.
Step 2: Disconnect the Battery
Prior to making any repairs, disconnect the vehicle’s battery to ensure safety. This prevents any electrical shock and protects the vehicle’s electronic components during the repair process.
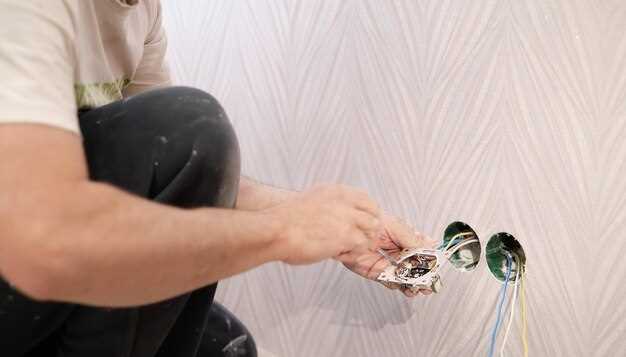
Step 3: Remove the Damaged Harness
Carefully remove the damaged wiring harness from the vehicle. Note the connections and routing of the wires to facilitate proper reinstallation. Use appropriate tools to disconnect connectors without causing further damage.
Step 4: Cut and Strip the Wires
Once the harness is detached, locate the damaged sections of the wire. Use wire cutters to remove the damaged parts, ensuring to leave enough length for reattachment. Strip the ends of the remaining wires using a wire stripper to prepare for splicing.
Step 5: Splice the Wires
Connect the stripped ends of the wires using solder or crimp connectors. If soldering, ensure that you use heat-shrink tubing to protect the splice. For crimp connections, ensure a secure fit to avoid future failures.
Step 6: Insulate the Repair
Once splicing is complete, cover the repaired areas with electrical tape or shrink tubing. This insulation is crucial to protect the wires from moisture and abrasion, which could lead to future issues.
Step 7: Reinstall the Wiring Harness
Carefully route the repaired wiring harness back in its original position within the vehicle. Make sure all connectors are secure and that the harness does not interfere with any moving parts or hot surfaces.
Step 8: Reconnect the Battery
After the harness is reinstalled, reconnect the vehicle’s battery. This step will re-enable the electrical systems and prepare them for testing.
Step 9: Test the System
Finally, conduct a thorough test of the automotive systems affected by the repaired wiring harness. Ensure that all functions operate correctly and there are no lingering electrical issues.
Following this step-by-step repair process will help ensure that the damaged wiring harness is effectively repaired, leading to reliable performance in automotive systems.
Preventive Measures to Extend Wiring Harness Lifespan
Proactively maintaining wiring harnesses is essential to ensure their longevity and reliability in automotive systems. Regular inspections can identify wear, fraying, and corrosion before they escalate into significant failures. This inspection process should include a visual examination of connectors and terminals, looking for signs of damage or loose connections that could lead to electrical shorts.
Applying protective coatings or harness wraps can shield wiring from moisture, heat, and mechanical abrasion. These materials act as barriers against environmental factors that can deteriorate the insulation and overall integrity of the harness. Additionally, ensuring that the wiring is properly secured in place minimizes movement and vibration, which often lead to electrical failures over time.
Utilizing high-quality connectors that are resistant to corrosion and harsh conditions can enhance the reliability of the wiring harness. Regularly lubricating these connectors can also prevent moisture ingress, which is a common issue in automotive environments. It’s advisable to replace worn-out connectors promptly to avoid future repair needs.
Educating automotive personnel about common wiring harness issues can help in early detection. Implementing a regular maintenance schedule that includes cleaning, inspecting, and testing electrical systems will contribute to a more robust wiring infrastructure, ultimately extending the lifespan of the harness.
Finally, keeping the vehicle’s software and electrical systems updated can help in monitoring and diagnosing issues related to the wiring harness. Advanced diagnostic tools can quickly flag potential problems, allowing for timely interventions before they require major repairs.


